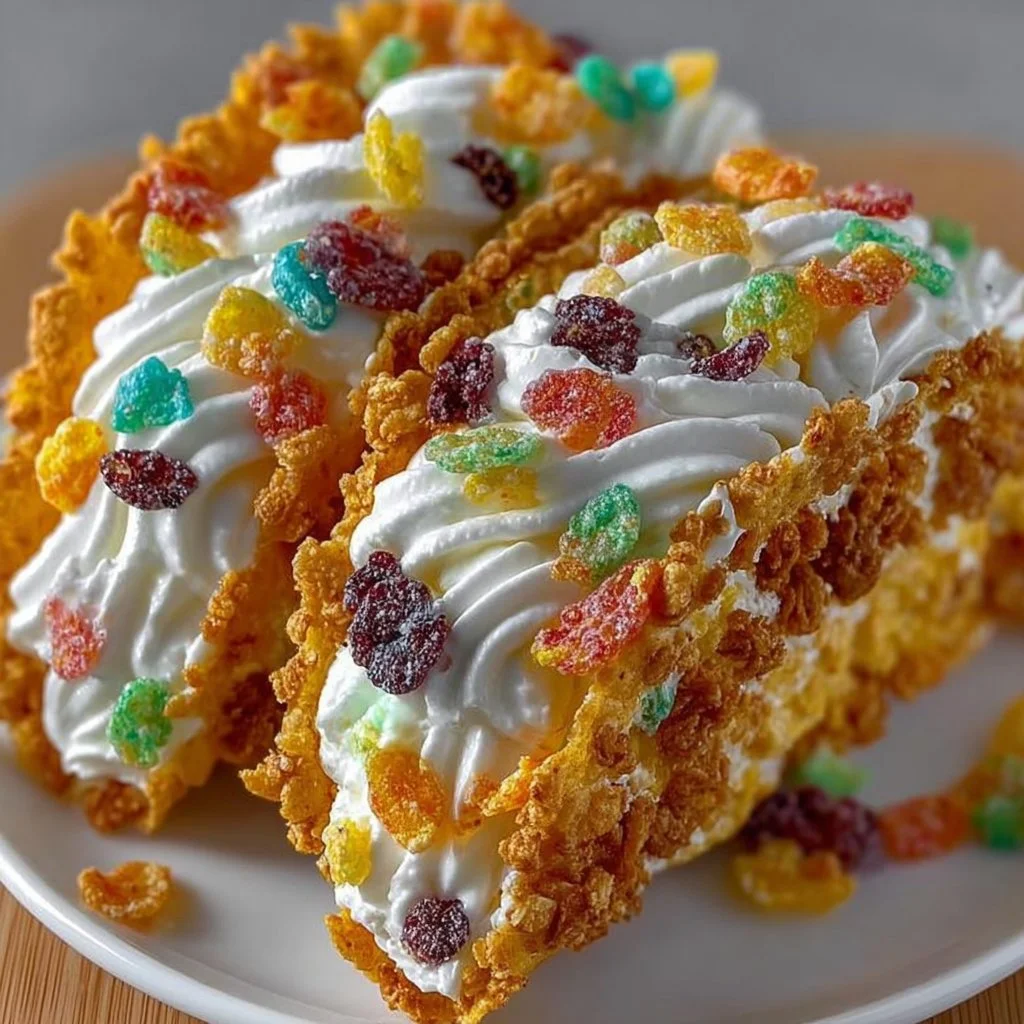
Fruity Pebbles Cheesecake Tacos
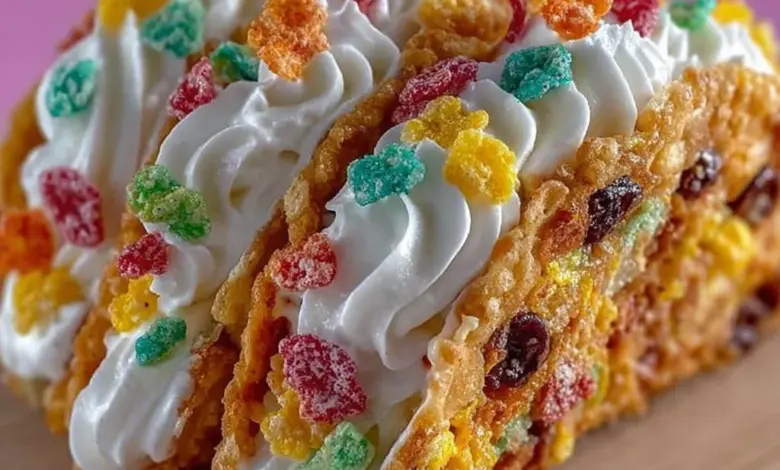
Creamy, crunchy, colorful, and utterly fun — these Fruity Pebbles Cheesecake Tacos are a playful mashup of nostalgic cereal and silky cheesecake, wrapped in a warm, crisp taco shell. If you love desserts that feel like a celebration in every bite, these tacos deliver bright fruity crunch alongside a dreamy cheesecake filling. Fun fact: Fruity Pebbles were first introduced in the 1970s and have inspired dozens of quirky desserts — this recipe is my favorite way to turn that childhood cereal into a party-ready treat.
This recipe is special because it’s simple, quick to assemble, and perfect for family gatherings or an after-school snack. Compared to a classic no-bake cheesecake on the blog, these tacos are far faster and don’t require a springform pan — just a muffin tin and a little patience while shells bake. Ready to make something whimsical and delicious? Let’s get cooking!
What is Fruity Pebbles Cheesecake Tacos?
What’s in a name? Fruity Pebbles Cheesecake Tacos is exactly what it sounds like: taco-shaped shells made from small flour tortillas, filled with a light and creamy Fruity Pebbles–studded cheesecake filling and topped with extra cereal for crunch. Who named it that — a dessert chef with a sweet tooth or a kid who couldn’t resist cereal for dinner? Maybe both. Isn’t it fun when a recipe makes you smile before the first bite?
This treat might make you remember that “the way to a man’s heart is through his stomach.” Whether you’re feeding kids, friends, or anyone who appreciates bright, crunchy sweets, these tacos are an easy way to spread joy. Try them and see who they win over at your next gathering.
Why You’ll Love This
- Playful contrast: The creamy cheesecake filling paired with the colorful, crispy Fruity Pebbles creates a delightful contrast of textures and flavors. Each bite has smooth, sweet cream cheese and a satisfying crunch.
- Wallet-friendly and easy: Making these at home saves money compared to buying specialty desserts. The ingredients are pantry-friendly and many are likely already on hand.
- Crowd-pleasing toppings: The Fruity Pebbles topping adds vibrant color and nostalgia, making these tacos great for parties, birthdays, or casual dessert nights.
If you enjoyed the cheesecake-stuffed strawberries on the blog, you’ll love this variation — it’s similarly creamy but way more whimsical and travel-friendly. Give them a try and bring a splash of fun to your dessert rotation.
How to Make
Quick Overview
This recipe is straightforward and perfect for beginners. Prep is minimal and the texture is the star: crispy taco shells cradle a fluffy, lightly sweetened cheesecake filling with Fruity Pebbles folded in for color and crunch. Total time: about 25 minutes active prep and 10 minutes baking, plus cooling time — plan for roughly 45 minutes from start to finish.
Ingredients
- 6–8 small flour tortillas (6–7 inch), lightly greased for shaping
- 1 cup Fruity Pebbles cereal, plus additional for topping
- 1/2 cup granulated sugar
- 8 oz cream cheese, softened to room temperature
- 1/2 cup powdered sugar, sifted if lumpy
- 1 tsp vanilla extract
- 1 cup whipped cream (freshly whipped or store-bought, chilled)
- Additional Fruity Pebbles for topping (about 1/4 cup or to taste)
Directions
- Preheat your oven to 350°F (175°C). Position a rack in the center so the taco shells bake evenly.
- In a medium bowl, combine 1 cup Fruity Pebbles and 1/2 cup granulated sugar. Stir gently so the cereal is coated in sugar; this gives the shells a little extra crunch and sweetness.
- Lightly grease both sides of the small flour tortillas with a neutral oil or nonstick spray. Press each tortilla into an upside-down muffin tin cup so the edges form a taco shape — don’t stretch them too thin.
- Sprinkle a little of the Fruity Pebbles + sugar mixture into each pressed tortilla to adhere to the shell interior. Bake the shells for about 10 minutes, or until they hold their shape and the edges are slightly golden. Keep an eye on them after 8 minutes to prevent over-browning.
- While shells bake, prepare the cheesecake filling. In a medium bowl, beat together the softened 8 oz cream cheese, 1/2 cup powdered sugar, and 1 tsp vanilla extract until smooth and free of lumps. Use a hand mixer or a sturdy whisk for best results.
- Gently fold in 1 cup whipped cream to the sweetened cream cheese until fully combined and fluffy. Be careful not to overmix — you want a light, airy texture.
- Once the taco shells have cooled completely (about 10 minutes), spoon or pipe the cheesecake mixture into each shell, filling them generously but not overstuffing.
- Top each filled taco with additional Fruity Pebbles just before serving so the cereal stays crisp.
What to Serve With
- Fresh fruit platter: Strawberries, banana slices, and kiwi balance the sweetness and add freshness.
- Cold milk or a fun milkshake: Classic pairings that enhance the cereal nostalgia.
- Sparkling lemonade or a fruity iced tea: The acidity cuts through the richness of the cheesecake filling.
- Simple vanilla or chocolate dipping sauce: For extra decadence, offer a small bowl of sauce for dipping.
Top Tips for Perfecting
- Soften cream cheese fully: Room-temperature cream cheese mixes more smoothly and avoids lumps in the filling.
- Don’t overbake shells: Check at 8–10 minutes. Overbaking makes shells too hard and brittle.
- Use a light hand folding whipped cream: Keep the filling airy by folding gently so it doesn’t deflate.
- Substitute cereals: If you want a different flavor profile, use Cocoa Pebbles or Fruity Pebbles mixed with crushed graham crackers for a sturdier shell.
- Make ahead: You can prepare the filling a few hours ahead and keep it chilled until ready to fill the shells to save time the day of serving.
Storing and Reheating Tips
- Refrigeration: Store assembled tacos in an airtight container in the refrigerator for up to 2 days. Note the cereal topping will soften over time; add extra Fruity Pebbles right before serving for maximum crunch.
- Freezing: The cheesecake filling can be frozen in an airtight container for up to 1 month. Thaw in the refrigerator overnight and re-whip gently before piping into fresh shells.
- Reheating: These are best served chilled or at room temperature. If you want warm shells, briefly reheat shells in a 300°F oven for 3–4 minutes, cool slightly, then fill with cold cheesecake.
FAQs
Can I make this recipe dairy-free?
Yes. Use dairy-free cream cheese and a dairy-free whipped topping substitute. Take care that your store-bought whipped topping is stable enough to hold shape.
Can I use corn tortillas instead of flour tortillas?
Small flour tortillas hold their shape better and become crisp without cracking. Corn tortillas may crack when shaped, but you can lightly warm and mold them carefully if that’s your preference.
How can I make the shells extra crispy?
Brush the greased shells lightly with melted butter or a thin layer of oil before baking and bake until just golden. Avoid overbaking to prevent burning.
Is this recipe kid-friendly?
Absolutely. Kids love the colorful cereal and the fun taco shape, and it’s a great activity to involve them in spooning and topping.
Can I prepare this ahead for a party?
Prepare the shells and filling ahead, but assemble right before serving to keep the Fruit Pebbles crunchy. Fillings can be stored in the fridge up to 24 hours in advance.
Conclusion
These Fruity Pebbles Cheesecake Tacos are a quick, charming dessert that’s equal parts nostalgia and sophistication — creamy cheesecake meets crunchy, colorful cereal in a fun taco form. They’re budget-friendly, simple to make, and a guaranteed hit with kids and adults alike. If you want a printable step-by-step or an alternate filling idea, check out this detailed variation for inspiration: Fruity Pebbles Tacos with Cheesecake Filing – My Homemade Recipe. Try them at your next gathering and watch them disappear!

Fruity Pebbles Cheesecake Tacos
Equipment
- Muffin Tin
- Mixing Bowl
- Hand Mixer
Ingredients
Taco Shells
- 6-8 small Flour Tortillas Lightly greased for shaping.
Cheesecake Filling
- 1 cup Fruity Pebbles Cereal Plus additional for topping.
- 1/2 cup Granulated Sugar
- 8 oz Cream Cheese Softened to room temperature.
- 1/2 cup Powdered Sugar Sifted if lumpy.
- 1 tsp Vanilla Extract
- 1 cup Whipped Cream Freshly whipped or store-bought, chilled.
- 1/4 cup Fruity Pebbles For topping, or to taste.
Instructions
- Preheat your oven to 350°F (175°C). Position a rack in the center so the taco shells bake evenly.
- In a medium bowl, combine 1 cup Fruity Pebbles and 1/2 cup granulated sugar. Stir gently so the cereal is coated in sugar; this gives the shells a little extra crunch and sweetness.
- Lightly grease both sides of the small flour tortillas with a neutral oil or nonstick spray. Press each tortilla into an upside-down muffin tin cup so the edges form a taco shape — don’t stretch them too thin.
- Sprinkle a little of the Fruity Pebbles + sugar mixture into each pressed tortilla to adhere to the shell interior. Bake the shells for about 10 minutes, or until they hold their shape and the edges are slightly golden. Keep an eye on them after 8 minutes to prevent over-browning.
- While shells bake, prepare the cheesecake filling. In a medium bowl, beat together the softened cream cheese, powdered sugar, and vanilla extract until smooth and free of lumps. Use a hand mixer or a sturdy whisk for best results.
- Gently fold in the whipped cream to the sweetened cream cheese until fully combined and fluffy. Be careful not to overmix — you want a light, airy texture.
- Once the taco shells have cooled completely (about 10 minutes), spoon or pipe the cheesecake mixture into each shell, filling them generously but not overstuffing.
- Top each filled taco with additional Fruity Pebbles just before serving so the cereal stays crisp.