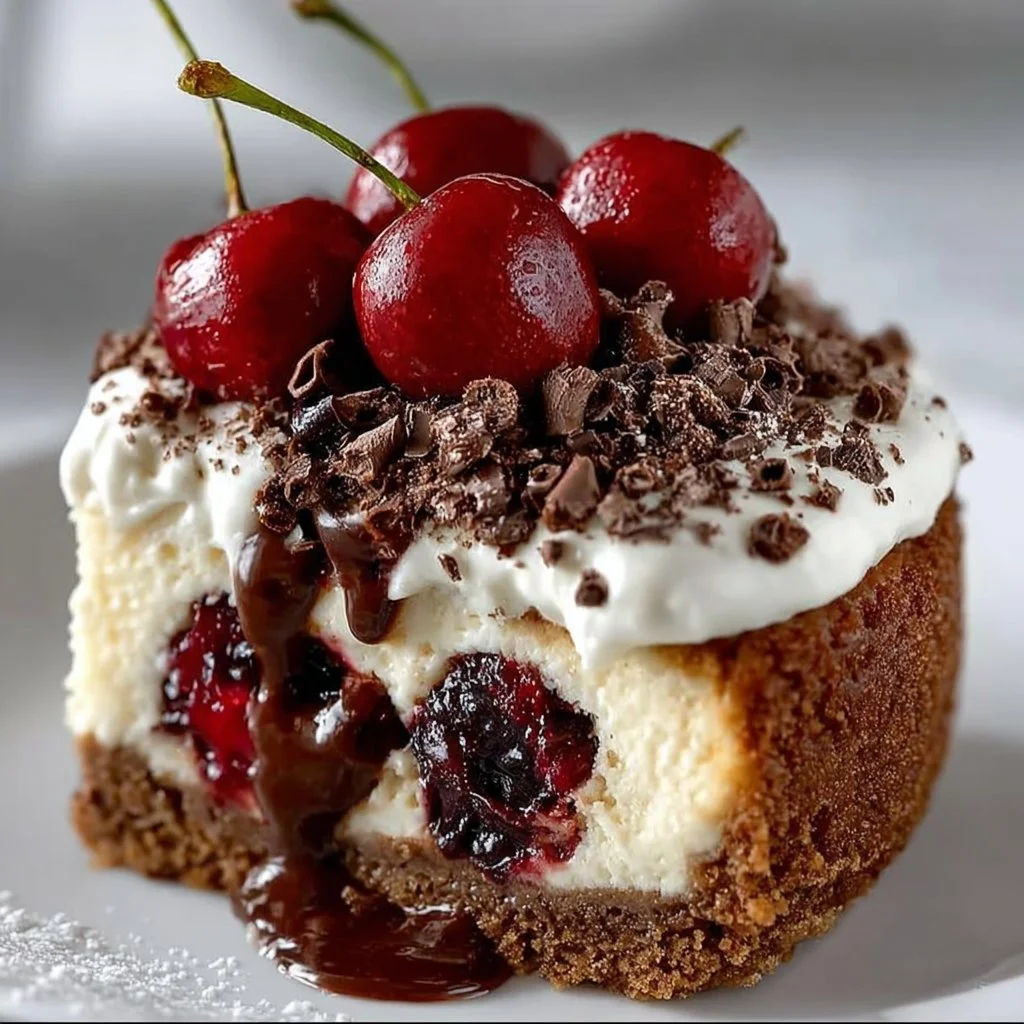
Black Forest Cheesecake
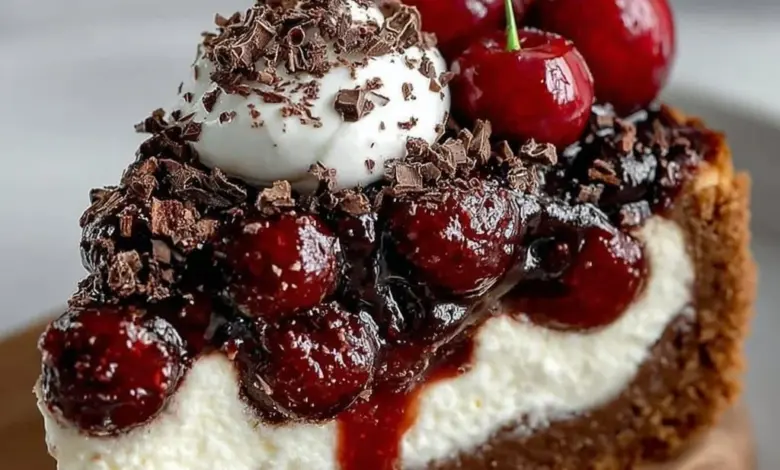
Creamy, chocolatey, and dotted with juicy cherries, this Black Forest Cheesecake is the kind of dessert that stops conversation and gets everyone reaching for seconds. It combines a silky cocoa cheesecake base with pillowy whipped cream and a bright cherry topping for a beautiful contrast of flavors and textures. Fun fact: Black Forest cake traditionally comes from Germany and celebrates cherries and chocolate together — and this cheesecake nods to that classic combo in a richer, more decadent way. This recipe is special because it’s surprisingly simple, quick to prepare, and perfect for family gatherings. If you love our Classic New York Cheesecake, you’ll find this version just as comforting but with an extra chocolate-cherry flair. Ready to bake something unforgettable? Let’s get started!
What is Black Forest Cheesecake?
What’s in a name — and why does “Black Forest” sound so dramatic? This cheesecake borrows its inspiration from the Black Forest cake, a German favorite known for chocolate, cherries, and whipped cream. So why call a cheesecake “Black Forest”? Because it marries the same beloved flavors in cheesecake form: cocoa in the batter, cherries on top, and cloud-like whipped cream. Curious why people rave about it? Maybe it’s true that “the way to a man’s heart is through his stomach.” Or maybe everyone just loves chocolate and cherries together. Either way, this dessert is playful, indulgent, and a little bit nostalgic. Try it and see which friend it wins over first.
Why You’ll Love This:
- Decadent and balanced: Lush chocolate cheesecake, light whipped cream, and tart-sweet cherry topping create a perfect trio of flavors and textures that melt in your mouth.
- Cost-smart and crowd-pleasing: Making this at home saves money compared to buying a specialty bakery cake and yields plenty to share — ideal for parties or weeknight treats.
- Easy ingredients, big payoff: Simple pantry staples like cream cheese, cocoa, and cherry pie filling transform into a show-stopping dessert with minimal fuss.
Compared to our Classic New York Cheesecake, this version adds a delightful chocolate depth and festive cherry topping that’s perfect for birthdays, holidays, or just because. Give it a try — your guests will be impressed.
How to Make:
Quick Overview
This Black Forest Cheesecake is easy to make and utterly satisfying. The steps are straightforward: beat the cream cheese until smooth, incorporate eggs and cocoa, bake until set, then chill and top. You’ll love the creamy texture and the sweet-tart pop of cherries. Total time: about 20 minutes active prep, 60–70 minutes baking, plus at least 4 hours chilling for best results.
Ingredients
- 24 oz cream cheese, softened to room temperature
- 1/2 cup granulated sugar
- 3 large eggs, room temperature
- 1 cup whipped cream (freshly whipped or store-bought), chilled
- 1/4 cup unsweetened cocoa powder, sifted to avoid lumps
- 1 cup cherry pie filling, chilled
- 1/2 cup chocolate shavings, for garnish (use a vegetable peeler on a chocolate bar)
Directions
- Preheat and prepare: Preheat the oven to 325°F (160°C). Grease a 9-inch springform pan on the bottom and sides with butter or nonstick spray. For easier removal, wrap the outside of the pan with foil if you plan to use a water bath.
- Beat cream cheese and sugar: In a large mixing bowl, beat the softened cream cheese and 1/2 cup granulated sugar with an electric mixer on medium speed until the mixture is smooth and free of lumps, about 2–3 minutes. Scrape down the sides of the bowl as needed.
- Add eggs one at a time: Add the eggs one at a time, mixing on low speed after each addition just until combined. Do not overmix; stop when the batter looks smooth and slightly glossy.
- Incorporate cocoa powder: Sift 1/4 cup cocoa powder into the batter and fold it in gently with a spatula or mix on low just until incorporated. Make sure there are no streaks.
- Pour into pan: Pour the cheesecake batter into the prepared 9-inch springform pan and smooth the top with a spatula. Tap the pan gently on the counter to release any large air bubbles.
- Bake until set: Bake at 325°F (160°C) for 60–70 minutes. The edges should be set and slightly puffed, while the center will still have a slight wobble when you gently shake the pan. Avoid overbaking to keep the texture creamy.
- Cool and chill: Turn off the oven and crack the oven door; let the cheesecake cool inside for 30 minutes to reduce cracking. Remove and let it cool completely at room temperature, then refrigerate for at least 4 hours (overnight is best) until thoroughly chilled.
- Top and serve: Before serving, spread 1 cup whipped cream over the chilled cheesecake, spoon 1 cup cherry pie filling on top, and sprinkle with 1/2 cup chocolate shavings. Release the springform pan and slice with a sharp knife, wiping the blade between cuts for neat slices.
What to Serve With:
- Fresh coffee or espresso to balance the sweetness
- A glass of dessert wine like Brachetto d’Acqui or a sweet Riesling for special occasions
- Light fruit salad or citrus sorbet to add brightness and counter the richness
- Simple butter biscuits or homemade shortbread for additional texture
Top Tips for Perfecting:
- Room-temperature ingredients: Bring the cream cheese and eggs to room temperature for a smooth, lump-free batter. Cold ingredients can cause curdling.
- Don’t overmix: Mix until combined. Overbeating can add air and cause cracks during baking.
- Water bath option: For an ultra-smooth top, bake the springform pan inside a larger pan filled with hot water (water bath) to keep the oven environment moist.
- Chill well: Refrigerating for at least 4 hours (preferably overnight) ensures clean slices and the best texture.
- Substitute ideas: Use dark cocoa for deeper chocolate flavor, or swap cherry pie filling for fresh macerated cherries for a fresher topping.
Storing and Reheating Tips:
- Refrigeration: Store leftover cheesecake covered tightly with plastic wrap or in an airtight container in the refrigerator for up to 4 days.
- Freezing: You can freeze un-topped slices wrapped in plastic and foil for up to 2 months. Thaw overnight in the refrigerator before adding whipped cream and cherry topping.
- Reheating: Cheesecake is best served chilled. If you prefer it slightly less cold, let slices sit at room temperature for 15–20 minutes before serving. Avoid microwaving, which can change the texture.
FAQs
How do I prevent my cheesecake from cracking?
Cool the cheesecake gradually: let it rest in the turned-off oven with the door ajar for 30 minutes, then cool fully on the counter before chilling. Avoid overmixing and overbaking.
Can I use a different topping instead of cherry pie filling?
Yes. Fresh macerated cherries, raspberry compote, or even caramel sauce all work beautifully. Choose something that balances the cocoa flavor.
Do I need a water bath?
No, it’s optional. A water bath helps prevent cracks and produces an ultra-creamy texture, but careful baking at a low temperature can also yield excellent results.
Can I make this gluten-free?
This recipe is naturally gluten-free if you don’t use a crust. If you add a crust, choose gluten-free cookie crumbs or almond flour as a base.
How long should I chill the cheesecake before serving?
Chill at least 4 hours for best texture, though overnight chilling is ideal for the cleanest slices and richest flavor.
Conclusion
This Black Forest Cheesecake is a homemade crowd-pleaser that’s easier to make than it looks and more rewarding than store-bought. With its creamy chocolate filling, plush whipped cream, and bright cherry topping, it’s perfect for celebrations or a special weekend treat. Give it a try and share the slices with friends and family — it’s a dessert that invites smiling faces and second helpings. For inspiration and a slightly different take on chocolate-cherry cheesecake, check out this recipe: Black Forest Cheesecake – Blue Bowl Recipes